
In this post we are going to see how to make snap installation packages for a program called lolcat.
What you need for this tutorial? This tutorial is similar to Snap a python application. If you first follow that tutorial, then this one will reinforce what you have learned and expand to dealing with more programming languages than just Python.
What will you learn?
- How to deal with different source code repositories and get into the process of snapping them in a snap (pun intended).
- How to use the Snapcraft plugins for Python, golang, Rust and C/C++.
- How to deal with confinement decisions and when to select strict confinement or classic confinement.
- How to test the quality of an app before releasing to the Ubuntu Store
- What is this true–color terminal emulator thing, what is lolcat and why it is cool (at least to a select few).
True-color terminal emulators
Terminal emulators like GNOME Terminal support the facility to display text in different colors.

You know this already because by default in Ubuntu you can see filenames in different colors, depending on whether they are executable (green), a directory (blue), a symbolic link (cyan) and so on. If you go 20+ years in the past, even the Linux console supported since then 256 colors.
What changed recently in terms of colors in the terminal emulators, is that newer terminal emulators support 16 million colors; what is described as true-color.

Here is an AWK script (of all scripting languages!) that shows a smooth gradient, from red to green to blue. In old terminal emulators and the Linux console, they were escape sequences to specify the colors, and you had to specify them by name. With the recent improvement among terminal emulators, it is now possible to specify the color by RGB value, thus 256*256*256 ~= 16 million different colors. You can read more about this in the article True Colour (16 million colours) support in various terminal applications and terminals. I found that AWK script there in this article. Try it one your Ubuntu as well!
Now, there is this Unix command called cat, which is used to print the contents of a text file in the terminal. cat /etc/passwd would show the contents of /etc/passwd. So, some people wrote an improved cat, called lolcat, that shows the content of files in a rainbow of colors.

In the screenshot above, the utility lolcat (a version we made and call lolcat-go) is used as a filter to a command (snapcraft –help), and colorizes the text that it receives with a nice rainbow of colors.
In practice, the lolcat utility merely sets the color for each character being printed. It starts with a random color and circles around the rainbow, heading diagonally towards the bottom-right. In the screenshot above, you can see the text snapcraft and Usage: in strong blue, and then diagonally (heading to bottom-right), the colors shift to green and then to orange.
Select which repositories to snap
The first implementation of the lolcat rainbow utility was probably by busyloop, written in Ruby. Since then, several others re-implemented lolcat into more programming languages. In this post we are going to snap:
- The Python lolcat by tehmaze.
- The golang lolcat by cezarsa.
- The Rust lolcat by ur0 (a version that uses Rust’s concurrency feature!)
- The C lolcat by jaseg (a version optimized for speed!)
-

- Python: URL and tag to select a specific version
-

- Go: URL and master branch
-

- Rust: URL and master branch
-

- C: URL and master branch
Here we can see a) the URL of the source code, the available b) branches and c) tags. This is useful in the next section when we instruct Snapcraft which version of the source code to use.
In terms of versions among the four implementations, the Python lolcat has a recent tag 0.44, therefore we are using this tag and specify a version 0.44. For the rest, we are using the latest (master) checkout of their repositories, so we use the current date as a version number, in the form YYYYMMDD (for example, 20170226).
Completing the snapcraft.yaml metadata
When creating a snap, we need to write up a nice snap summary (less than 80 characters) and a description (less than 100 words). The summary will look like lolcat-python utility written in Python, and the description lolcat is a utility similar to the Unix “cat” command. lolcat adds rainbow colors to the text output.
In addition, we need suitable names for the four snaps. We are going to use lolcat-python, lolcat-go, lolcat-rust, and lolcat-c for each one of the four snaps.
All in all, here is the information we collected so far:
- Python: name is “lolcat-python“, version is “0.44“, summary: lolcat-python utility written in Python, description: lolcat-python is a utility similar to the Unix “cat” command. lolcat-python adds rainbow colors to the text output.
- Go: name is “lolcat-go“, version is “20170226“, summary: lolcat-go utility written in Go, description: lolcat-go is a utility similar to the Unix “cat” command. lolcat-go adds rainbow colors to the text output.
- Rush: name is “lolcat-rust“, version is “20170226“, summary: lolcat-rust utility written in Rust, description: lolcat-rust is a utility similar to the Unix “cat” command. lolcat-rust adds rainbow colors to the text output.
- C: name is “lolcat-c“, version is “20170226“, summary: lolcat-c utility written in C, description: lolcat-c is a utility similar to the Unix “cat” command. lolcat-c adds rainbow colors to the text output.
The final part in the metadata is the grade (whether it is devel or stable) and the confinement (whether it is devmode, classic or strict).
We select stable as the grade because we aim to add these snaps to the Ubuntu Store. If the grade is specified as devel, then the corresponding snap cannot be added to the stable channel (publicly available to all) of the Ubuntu Store. There is a section below on testing the four lolcat implementations and we will set accordingly the grade to either stable or devel, depending on the outcome of these tests.
We select initially devmode (DEVeloper MODE) as the confinement in order not to confine initially out snap. If our snap fails to run, we want to be sure it is some issue with our settings and not a byproduct of the choice of a stricter confinement. Once the snap can be built and run successfully, we change the confinement to either strict or classic and deal at that point with any issues that appear from there on.

Here is how the metadata look in the snapcraft.yaml configuration file for the Python variant of the snap.
Up to this point, all four snapcraft.yaml files, with metadata filled in, can be found at https://github.com/simos/lolcat-snap/tree/v1.0
Working on the “parts” section in snapcraft.yaml
We completed the easy metadata section, now it is time to work on the parts: section of snapcraft.yaml. (After the parts: section work, we just need the apps: section, where we expose the generated executable to the users of the snap).
Initially, snapcraft init will generate a stock snapcraft.yaml file, which has a stub parts: section. Here it how it looks,
parts:
  my-part:
    # See 'snapcraft plugins'
    plugin: nil
It defines the start of the parts: section. Then, a name, my-part: (we choose this name) is defined. Finally, the contents of my-part: are listed, here in two lines. The first line of my-part: is a comment (starts with #) and the second specifies the plugin, which is nil (it is reserved, and does nothing).
Note how these lines are aligned vertically. First is parts: at the start of the line, then two columns further, is my-part:. Then, two more columns further, we get the comment and the plugin: directive, both on the same column. We use spaces and not tabs. If you get any errors later on, check that you follow properly the formatting. You can have the levels separated by more than two columns, if you wish. But make sure that the same level lines are aligned on the same column.
Let’s figure out the initial versions of the parts:. Let’s do Python first!
parts:
  lolcat-python:
    source: https://github.com/tehmaze/lolcat.git
    source-tag: '0.44'
    plugin: python
We used the name lolcat-python: (our choice) for the name of this parts:. In there, we specify the source: for the source code repository, and any branches or tags that may be relevant. As we saw above, we work on the 0.44 tag. Finally, the source is written in Python, and we select the python plugin. (We will figure out later if we need to specify which of Python 2 or Python 3, if we get a relevant error).
Here is the Go,
parts:
  lolcat-go:
    source: https://github.com/cezarsa/glolcat.git
    plugin: go
Fairly expected. We do not specify a version, therefore it will use the latest snapshot of the source at the time of running snapcraft. We chose the name locat-go, and the golang plugin is called go.
Time for Rust,
parts:
  lolcat-rust:
    source: https://github.com/ur0/lolcat.git
    plugin: rust
Again, very similar to the above. We do not specify a specific source code version (there isn’t any tag or stable branch in the repository). We chose the name lolcat-rust, and the Rust plugin in snapcraft is called rust.
Finally, the version written in C,
parts:
  lolcat-c:
    source: https://github.com/jaseg/lolcat.git
    plugin: make
Again, we chose a name for this part, and it’s lolcat-c. Then, specified the URL for the source code. As for the plugin, we wrote make, although the source is written in C. Actually, the plugin: directive specifies how to build the source code. The make plugin does the make; make install sequence for us, and it’s our first choice when we see an existing Makefile file in a repository.
At this stage, we have four initial versions of configuration files. We are ready to try them out and deal with any errors that may appear.
Working on the Python version
Here is the configuration (snapcraft.yaml) for the Python variant up to this point,
name: lolcat-python
version: '0.44'
summary: lolcat utility written in Python
description: |
  lolcat-python is a utility similar to the Unix "cat" command.
  lolcat-python adds rainbow colors to the text output.
  The source code is available at https://github.com/tehmaze/lolcat

grade: stable
confinement: devmode

parts:
  lolcat-python:
    source: https://github.com/tehmaze/lolcat.git
    source-tag: '0.44'
    plugin: python
Let’s run snapcraft prime. The prime parameter will perform the necessary compilation and will put the result in the prime/ subdirectory. Since snapcraft prime does only the initial compilation steps, it is more convenient to use for repeated tests. Once it works with snapcraft prime, we would be ready in a single extra step to produce the final .snap file (by running snapcraft, no parameters).
$ snapcraft prime
Preparing to pull lolcat-python
[...]
Pulling lolcat-python
[...]
Installing collected packages: pip, six, pyparsing, packaging, appdirs, setuptools, wheel
[...]
Successfully downloaded lolcat
Preparing to build lolcat-python
Building lolcat-python
[...]
Successfully built lolcat
[...]
Successfully installed lolcat-0.44
Staging lolcat-python
Priming lolcat-python
$ _
It worked beautifully! Any result is in the prime/ subdirectory, and we can identify even the executable.
$ ls prime/
bin/  etc/  lib/  meta/  snap/  usr/
$ ls prime/bin
lolcat*
$ _
We are now ready to create the apps: section of the snapcraft.yaml configuration file, in order to expose the executable to the users,
apps:
  lolcat-python:
    command: lolcat
The name: of this snap is lolcat-python, and the name we chose in the apps: section is the same, lolcat-python. Since they are the same, once we install the snap, the newly available command will be called lolcat-python. If there was a difference between the two (for example, name: lolcat-python and apps: lolcat: […], then the command for the users would end up being something like lolcat-python.lolcat, which may not be desirable.
Working on the Go version
Here is the configuration (snapcraft.yaml) for the Go variant up to this point,
name: lolcat-go
version: '20170226'
summary: lolcat utility written in golang
description: |
  lolcat-go is a utility similar to the Unix "cat" command.
  lolcat-go adds rainbow colors to the text output.
  The source code is available at https://github.com/cezarsa/glolcat

grade: devel
confinement: devmode

parts:
  lolcat-go:
    source: https://github.com/cezarsa/glolcat.git
    plugin: go
Let’s run snapcraft prime and see how it goes.
$ snapcraft prime
Preparing to pull lolcat-go
[...]
Building lolcat-go
[...]Staging lolcat-go
Priming lolcat-go
$ ls prime/bin/
glolcat.git
$ _
Lovely! The go plugin managed to make sense of the repository and compile the Go version of lolcat. The generated executable is called glolcat.git. Therefore, the apps: section looks like
apps:
  lolcat-go:
    command: glolcat.git
In this way, once we install the Go snap of lolcat, there will be an executable lolcat-go exposed to the users. This executable will be the glolcat.git that was generated by the Snapcraft go plugin in prime/bin/. Snapcraft tries to find the final executable in either prime/ or prime/bin/, therefore we do not need to specify specifically bin/glolcat.git.
Working on the Rust version
Here is the configuration (snapcraft.yaml) for the Rust variant up to this point,
name: lolcat-rust
version: '20170226'
summary: lolcat utility written in Rust
description: |
  lolcat-rust is a utility similar to the Unix "cat" command.
  lolcat-rust adds rainbow colors to the text output.
  The source code is available at https://github.com/ur0/lolcat

grade: stable
confinement: devmode

parts:
  lolcat-rust:
    source: https://github.com/ur0/lolcat.git
    plugin: rust
Let’s run snapcraft prime and see how it goes.
$ snapcraft prime
Preparing to pull lolcat-rust
[...]
Downloading 'rustup.sh'[================] 100%
[...]
Preparing to build lolcat-rust
Building lolcat-rust
[...]
Staging lolcat-rust
Priming lolcat-rust
$ ls prime/bin/
lolcat
$ _
Without a hitch! The rust plugin noticed that we do not have the Rust compiler, and downloaded it for us! Then, it completed the compilation and the final executable is called lolcat. Therefore, the apps: section looks like
apps:
  lolcat-rust:
    command: lolcat
The apps: section will expose the generated lolcat executable by the name lolcat-rust. Since the name: field is also lolcat-rust, the resulting executable once we install the snap will be lolcat-rust as well. Again, Snapcraft looks by default into both prime/ and prime/bin/ for the command:, therefore it is not required to write specifically command: bin/lolcat.
Working on the C (make) version
Here is the configuration (snapcraft.yaml) for the C (using Makefile) variant up to this point,
name: lolcat-c
version: '20170226'
summary: lolcat utility written in C
description: |
  lolcat-c is a utility similar to the Unix "cat" command.
  lolcat-c adds rainbow colors to the text output.
  The source code is available at https://github.com/jaseg/lolcat

grade: stable
confinement: devmode

parts:
  lolcat-c:
    source: https://github.com/jaseg/lolcat.git
    plugin: make
Let’s run snapcraft prime and see how it goes.
$ snapcraft prime
Preparing to pull lolcat-c
Pulling lolcat-c
[...]
Submodule 'memorymapping' (https://github.com/NimbusKit/memorymapping) registered for path 'memorymapping'
Submodule 'musl' (git://git.musl-libc.org/musl) registered for path 'musl'
Cloning into 'memorymapping'...
[...]
Cloning into 'musl'...
[...]
Building lolcat-c
make -j4
"Using musl at musl"
cd musl; ./configure
[...]sh tools/musl-gcc.specs.sh "/usr/local/musl/include" "/usr/local/musl/lib" "/lib/ld-musl-x86_64.so.1" > lib/musl-gcc.specs
printf '#!/bin/sh\nexec "${REALGCC:-gcc}" "$@" -specs "%s/musl-gcc.specs"\n' "/usr/local/musl/lib" > tools/musl-gcc
chmod +x tools/musl-gcc
make[1]: Leaving directory '/home/myusername/SNAPCRAFT/lolcat-snap/c/parts/lolcat-c/build/musl'
Command '['/bin/sh', '/tmp/tmpetv6irll', 'make', '-j4']' returned non-zero exit status 2
Exit 1
$ _
Well, well. Finally an error!
So, the C version of lolcat was written using the musl libc library. This library was referenced as a git submodule, and snapcraft followed the instructions of the Makefile to pull and compile musl!
Then, for some reason, snapcraft fails to compile lolcat using a musl-gcc wrapper for this newly compiled musl libc. As if we need to specify that the make ; make install sequence should instead be make lolcat; make install. Indeed, looking at the instructions at https://github.com/jaseg/lolcat, this appears to be the case.
Therefore, how do we tell snapcraft that for the make plugin, it should run make lolcat instead of the standard make?
By reading the documentation of the Snapcraft make plugin, we find that
- make-parameters:
 (list of strings)
 Pass the given parameters to the make command.
Therefore, the parts: should look like
parts:
  lolcat-c:
    source: https://github.com/jaseg/lolcat.git
    plugin: make
    make-parameters: [lolcat]
We enclose lolcat in brackets ([lolcat]) because make-parameters accepts a list of strings. If it accepted just a string, we would not need those brackets.
Let’s snap prime again!
$ snapcraft prime
Preparing to pull lolcat-c
[...]
Building lolcat-c
make lolcat -j4
"Using musl at musl"
[...]
chmod +x tools/musl-gcc
[...]
gcc -c -std=c11 -Wall -g -Imusl/include -o lolcat.o lolcat.c
[...]
Staging lolcat-c
Priming lolcat-c
$ ls prime/bin
ls: cannot access 'prime/bin': No such file or directory
Exit 2
$ ls prime/
censor*  command-lolcat-c.wrapper*  lolcat*  meta/  snap/
$ _
Success! The lolcat executable has been generated, and in fact it is located in prime/ (not in prime/bin/ as in all three previous cases). Also, it took 1 minute and 40 seconds to produce the executable on my computer!
Hmm, there is also a censor executable. I wonder, what does it do?
$ ls -l | ./censor
█▄█▄█ ██
█▄▄▄▄█▄▄█▄ █ ▄▄▄▄ ▄▄▄▄ █████ ███  ██ ██:██ ▄▄▄▄▄▄
█▄▄▄▄█▄▄█▄ █ ▄▄▄▄ ▄▄▄▄   ███ ███  ██ ██:██ ▄▄▄▄▄▄███▄█▄▄██▄.▄▄▄▄▄▄▄
█▄▄▄▄█▄▄█▄ █ ▄▄▄▄ ▄▄▄▄ █████ ███  ██ ██:██ █▄█▄▄█
█▄▄▄▄▄▄▄█▄ █ ▄▄▄▄ ▄▄▄▄  ████ ███  ██ ██:██ ▄▄█▄
█▄▄▄▄▄▄▄█▄ █ ▄▄▄▄ ▄▄▄▄  ████ ███  ██ ██:██ ▄▄▄▄
$ _
This censor executable is a filter, just like lolcat, and what it does is that it replaces any input letters with block characters. Like censoring the text. Let’s expose both lolcat and censor in this snap! Here is the apps: section,
apps:
  lolcat-c:
    command: lolcat
  censor:
    command: censor
For lolcat, since both the name: and the apps: command are named lolcat-c, the final executable will be lolcat-c. For censor, the executable will be named lolcat-c.censor (composed from the name: and the name we put in apps:).
Which confinement, strict or classic?
When we are about to publish a snap to the Ubuntu Store, we need to decide which confinement to apply, strict or classic.
The strict confinement will by default fully restrict the snap and it is up to us to specify what is allowed. For example, there will be no network connectivity, and we would need to explicitly specify it if we want to provide network connectivity.
The strict confinement can be tricky if the snap needs to read files in general. If the snap were to read file only from the user’s home directory, then that’s easy because we can specify plugs: [home] and be done with it.
In our case, lolcat can be used in two ways,

Note the different colors; the lolcat implementations start every time with a random initial rainbow color
In the first command, lolcat-go requires read access for the file /etc/lsb-release. This would be tricky to specify with the strict confinement, and we would need to use the classic confinement instead.
In the second command, lolcat-go is merely used as a filter. The executable is self-contained and does not read any files whatsoever. Because the cat command does the reading for lolcat.
Therefore, we can select here the strict confinement as long as we promise to use lolcat as a filter only. That is, lolcat would run fully confined! And it will fail if we ask it to read a file like in the first command.
Final configuration files
Here are the four final configuration files! I highlight below what really changes between them (bold+italics).
$ cat python/snap/snapcraft.yaml
name: lolcat-python
version: '0.44'
summary: lolcat utility written in Python
description: |
  lolcat-python is a utility similar to the Unix "cat" command.
  lolcat-python adds rainbow colors to the text output.
  The source code is available at https://github.com/tehmaze/lolcat

grade: stable
confinement: strict

apps:
  lolcat-python:
    command: lolcat

parts:
  lolcat-python:
    source: https://github.com/tehmaze/lolcat.git
    source-tag: '0.44'
    plugin: python

$ cat go/snap/snapcraft.yaml
name: lolcat-go
version: '20170226'
summary: lolcat utility written in golang
description: |
  lolcat-go is a utility similar to the Unix "cat" command.
  lolcat-go adds rainbow colors to the text output.
  The source code is available at https://github.com/cezarsa/glolcat

grade: devel
confinement: strict

apps:
  lolcat-go:
    command: glolcat.git

parts:
  lolcat-go:
    source: https://github.com/cezarsa/glolcat.git
    plugin: go

$ cat rust/snap/snapcraft.yaml
name: lolcat-rust
version: '20170226'
summary: lolcat utility written in Rust
description: |
  lolcat-rust is a utility similar to the Unix "cat" command.
  lolcat-rust adds rainbow colors to the text output.
  The source code is available at https://github.com/ur0/lolcat

grade: stable
confinement: strict

apps:
  lolcat-rust:
    command: lolcat

parts:
  lolcat-rust:
    source: https://github.com/ur0/lolcat.git
    plugin: rust

$ cat c/snap/snapcraft.yaml
name: lolcat-c
version: '20170226'
summary: lolcat utility written in C
description: |
  lolcat-c is a utility similar to the Unix "cat" command.
  lolcat-c adds rainbow colors to the text output.
  The source code is available at https://github.com/jaseg/lolcat

grade: stable
confinement: strict

apps:
  lolcat-c:
    command: lolcat
  censor:
    command: censor

parts:
  lolcat-c:
    source: https://github.com/jaseg/lolcat.git
    plugin: make
    make-parameters: [lolcat]
$ _
Quality testing
We have four lolcat snaps available to upload to the Ubuntu Store. Let’s test them first to see which ones are actually good enough to make it today to the Ubuntu Store!
A potential problem with filters like lolcat, is that they may not know how to deal with some UTF-8-encoded strings. In the UTF-8 encoding, text in English like what you read now, is encoded just like ASCII. Problems may occur when you have text in other scripts, where each Unicode character would occupy more than one byte. For example, each character in “Γεια σου κόσμε” is encoded as two bytes in the UTF-8 encoding. Furthermore, there are characters that are stored in Plane 1 of Unicode (Emojis!) which require the maximum of four bytes to encode in UTF-8. Here is an example of emoji characters, “🐧🐨🐩🐷🐸🐹🐺🐼🏴👏” (if they appear as empty boxes, you do not have the proper fonts installed.

What we are seeing here, is that the current implementations of lolcat for Python and Go do not work with non-ASCII encodings. At the moment, they can only colorize text in English.
On the other hand, the Rust and C implementations work fine on all Unicode characters!
There is another issue to watch for. Specifically,

The Unix ls command takes care to understand when you are redirecting the output, and if you do so, by default it does not colorize the output. This is a very useful default for ls because in most cases you want clean text files with no escape sequences for the color. To further our testing, let’s see how well the remaining two lolcat implementations deal with content that happen to already have escape sequences (for example, for color),

We generated a text file (cat-color.txt) with color escape sequences. The Rust implementation choked on them, while the C implementation worked fine!
We have a winner! The C implementation of lolcat will be published in the Ubuntu Store, in the stable channel (available to all). The Rust implementation will be published in the candidate channel (pending a fix when dealing with text that already has escape sequences), while the Python and Go implementations will be published in the edge channels. (Note: if the authors of these lolcat implementations are reading this, my aim here is to demonstrate the different channels. I plan to write a follow-up post on how to fix these issues in the source code and how to re-release all snaps to the stable channel.)
Let’s publish to the Ubuntu Store
The documentation page Publish your snap from snapcraft.io explains the details on publishing a snap on the Ubuntu Store.
In summary, when releasing a snap to the Ubuntu Store, you specify in which channel(s) you want it to be in:
- stable channel, for publicly available snaps. These can be searched when running snap find, and will be installed when you run snap install.
- candidate channel, for snaps that are very soon to be released to the stable channel. For this and the following channels, you need to specify explicitly the channel when you try to install. Otherwise, you will get the error that the snap is not found.
- beta channel, for beta versions of snaps.
- edge channel, for testing versions of snaps. This is the furthest away from stable.
If you release a snap in the stable channel, it implies that it will be shown in those below. Or, if you release a snap in the beta channel, it will appear as well in the channel below (edge).
Furthermore, when we were filling in the metadata of the snapcraft.yaml configuration files, there was a field called grade, with options for either stable or devel. If the grade has been specified as devel, then the snap can only be installed in either the beta or edge channels.
So, this is what we are going to do:
- The C implementation, lolcat-c, will have grade: stable, and get published in the stable channel of the Ubuntu Store.
- The Rust implementation, lolcat-rust, will have grade: devel, and get published in the beta channel of the Ubuntu Store.
- The Go and Python implementations, lolcat-go and lolcat-python, will have the grade: devel and get published in the edge channel of the Ubuntu Store.
We have already ran snapcraft login, and logged in with our Ubuntu Single SignOn (SSO) account.

We successfully registered the names on the Ubuntu Store, and then we pushed the snap files. We note down the revision, which is Revision 1 for each one of them.
The snapcraft release command looks like
snapcraft [options] release <snap-name> <revision> <channel>

The snapcraft release command instructs the Ubuntu Store to release the recently pushed .snap file into the specified channels.
How to install them
Here we install lolcat-c.

First we perform a search for lolcat. The snap lolcat-c is found. There is a feature in the snap find command, that if we were to search for lolcat-c, it would show results for both lolcat and c (shows irrelevant results).
We then run the snap info command to show the Ubuntu Store info for the snap lolcat-c.
Then, we install lolcat-c, by running snap install lolcat-c.
Finally, we run snap info again, and we can see more information since the snap has just been installed. In particular, we can see that there is the additional command lolcat-c.censor. Oh, and then snap is just 24kB in size.
Let’s install the Rust implementation!

The Rust implementation of lolcat can be found in the beta and edge channels. In order to install it, we need to specify the correct channel (here, either beta or edge). And that’s it!

The Go implementation of lolcat is in the edge channel. We install and test it successfully.
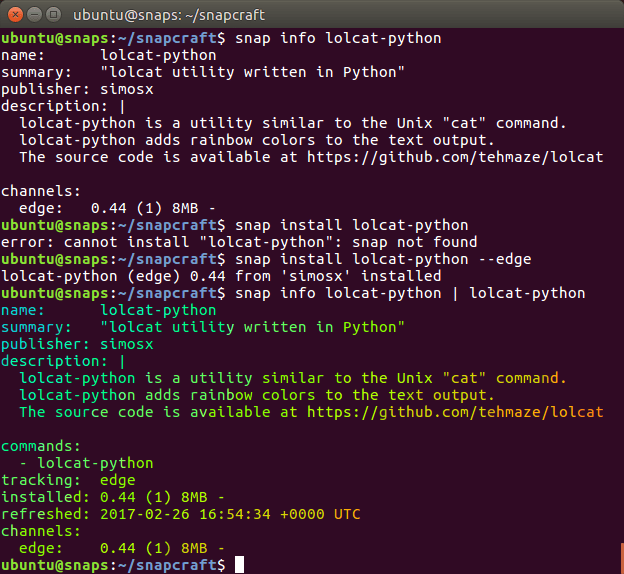
Finally, the Python implementation of lolcat, installed from the edge channel.
Hope you enjoyed the post!
Recent Comments