
I would like to thank Brian Mullan for sharing his notes on getting X2Go to work on LXD containers. Prior to this, I never used X2Go before.
You would typically use LXD (pronounced LexDee) containers to run server software. However, you can also run GUI apps. If the LXD containers are located on your desktop computer, then you have the option to follow the guide How to run graphics-accelerated GUI apps in LXD containers on your Ubuntu desktop. There is an alternative though with the X2Go remote desktop, which has the following differences:
- the X2Go remote desktop is particularly suited if the LXD containers are on a different computer than your desktop computer
- you can run a full desktop environment in a window with the X2Go remote desktop
- the X2Go remote desktop window is separated from your desktop, and this has positive security implications.
Let’s recap the options on how to get a GUI app, that runs in an LXD container, appear on your desktop.
- Using ssh with X11 forwarding, using the ssh -X parameter to forward the GUI of programs running in an LXD container, onto your desktop. For example, ssh -X ubuntu@10.100.0.5 xclock If xclock is installed in the container, then it will run, and the window will appear on our desktop. If then network connection is less than LAN, then there can be lots of lag.
- Using Unix sockets to get graphics-accelerated GUI apps on your desktop. Mainly works if the LXD containers are on the same computer as your actual desktop.
- Using software like X2Go remote desktop that requires to install packages on both the server (the LXD container) and the client (your desktop computer). It is similar to ssh with X11 forwarding as they both use SSH for the transport. They are unlike in the sense that X2Go does better compression and overall management of the remote desktop session.
In the following, we install the necessary software on a LXD container (the server in X2Go terminology) and then the software on our desktop (the client). Finally, we try it out. Our aim is to create desktop icons that when you run them, you get them application running from the LXD container.
Prerequisites
Here are the prerequisites.
- You have set up LXD on your computer or a remote computer.
- You have set up SSH public-key authentication on your computer. Your keypair is ~/.ssh/id_rsa (private) and ~/.ssh/id_rsa.pub (public).
Installing the X2Go server in a LXD container
Let’s create a container, then install the X2Go server software. The X2Go server software is apparently only available in the X2Go PPA, therefore we set up the PPA in the LXD container. Then, we install the two required packages and exit the container.
$ lxc launch ubuntu:16.04 x2go
Creating x2go
Starting x2go

$ lxc exec x2go -- sudo --user ubuntu --login
To run a command as administrator (user "root"), use "sudo <command>".
See "man sudo_root" for details.


ubuntu@x2go:~$ sudo apt-add-repository ppa:x2go/stable
 Quick howto to turn your machine into an X2Go server:

sudo apt-add-repository ppa:x2go/stable
sudo apt-get update
sudo apt-get install x2goserver x2goserver-xsession
sudo apt-get install x2gomatebindings # if you use MATE/mubuntu
sudo apt-get install x2golxdebindings # if you use LXDE/lubuntu

Quick howto to install the x2goclient:

sudo apt-add-repository ppa:x2go/stable
sudo apt-get update
sudo apt-get install x2goclient

Enjoy!
 More info: https://launchpad.net/~x2go/+archive/ubuntu/stable
Press [ENTER] to continue or ctrl-c to cancel adding it

gpg: keyring `/tmp/tmpzt1w7nxq/secring.gpg' created
gpg: keyring `/tmp/tmpzt1w7nxq/pubring.gpg' created
gpg: requesting key 0A53F9FD from hkp server keyserver.ubuntu.com
gpg: /tmp/tmpzt1w7nxq/trustdb.gpg: trustdb created
gpg: key 0A53F9FD: public key "Launchpad PPA for x2go" imported
gpg: Total number processed: 1
gpg: imported: 1 (RSA: 1)
OK


ubuntu@x2go:~$ sudo apt update
...
ubuntu@x2go:~$ sudo apt-get install x2goserver x2goserver-xsession
...
Need to get 49.6 MB of archives.
After this operation, 273 MB of additional disk space will be used.
Do you want to continue? [Y/n] Y
...
ubuntu@x2go:~$ exit
$
The LXD container runs the stock Ubuntu 16.04 LTS. This means that there is already an SSH server running, and there is also a non-root user account that has the username ubuntu. There are no existing credentials in the container that were set up, so let’s do proper SSH public key authentication (instead of using passwords).
If you already created an SSH key-pair, skip to the next paragraph. If not, see How To Set Up SSH Keys and perform Steps 1 and 2. If everything went well, you should have a file ~/.ssh/id_rsa.pubin your home directory.
Now, copy as follows the id_rsa.pub file into the container, at the location ~ubuntu/.ssh/authorized_keys. By doing so, you can SSH into the container without supplying a password. You will type once the passphrase, but no passwords every time!
$ lxc file push ~/.ssh/id_rsa.pub x2go/home/ubuntu/.ssh/authorized_keys
$
To connect with SSH, you first need the IP address of the container. You can find that with lxc list and look for the x2go container name.
$ lxc list
+-------+---------+----------------------+------------+-----------+
| NAME  | STATE   | IPV4                 | TYPE       | SNAPSHOTS |
+-------+---------+----------------------+------------+-----------+
| x2go  | RUNNING | 10.52.252.197 (eth0) | PERSISTENT | 0         |
+-------+---------+----------------------+------------+-----------+
Test now by connecting with SSH to the LXD container.
$ ssh ubuntu@10.52.252.152
Welcome to Ubuntu 16.04.3 LTS (GNU/Linux 4.13.0-32-generic x86_64)

* Documentation: https://help.ubuntu.com
 * Management: https://landscape.canonical.com
 * Support: https://ubuntu.com/advantage

Get cloud support with Ubuntu Advantage Cloud Guest:
 http://www.ubuntu.com/business/services/cloud

0 packages can be updated.
0 updates are security updates.

The programs included with the Ubuntu system are free software;
the exact distribution terms for each program are described in the
individual files in /usr/share/doc/*/copyright.

Ubuntu comes with ABSOLUTELY NO WARRANTY, to the extent permitted by
applicable law.

ubuntu@x2go:~$ exit
$
Since we are at it, let’s do a test run with a GUI app using SSH’s X11 forwarding. This is without X2Go software, and it would help us compare which is more suitable for our needs later on. Run ssh with the -X parameter, and supply the GUI command to run. When you installed X2Go in the LXD container, some additional applications were installed including the xclock GUI app (so it’s already there). That’s the one you are testing here.
$ ssh -X ubuntu@10.52.252.152 xclock
/usr/bin/xauth: file /home/ubuntu/.Xauthority does not exist
Warning: locale not supported by C library, locale unchanged


Click to close xclock.
We will revisit the LXD container to install browsers and also full desktop environments. At the moment, we keep it clean, and have verified that SSH works. It’s time to install X2Go client software on the local computer.
Installing X2Go client software on our desktop
Install the X2Go graphical client on the client (the LXD host).
Installing the X2Go client software
On your desktop, install the package x2goclient.
$ sudo apt install x2goclient
Then, run the client either from command line or from the Dash.
$ x2goclient
Because it is the first time you run x2goclient, you are prompted immediately to create a new session. A session is a set of configurations to launch a specific GUI program or even graphical environment.

Testing x2goclient with the xclock application
Set up the session to run xclock. Here is how the configuration should look. Change the Host IP address to that of your own LXD container x2go.
Specifically,
- Add a session name (xclock)
- Put the IP address of your container. It is the IP address you used earlier.
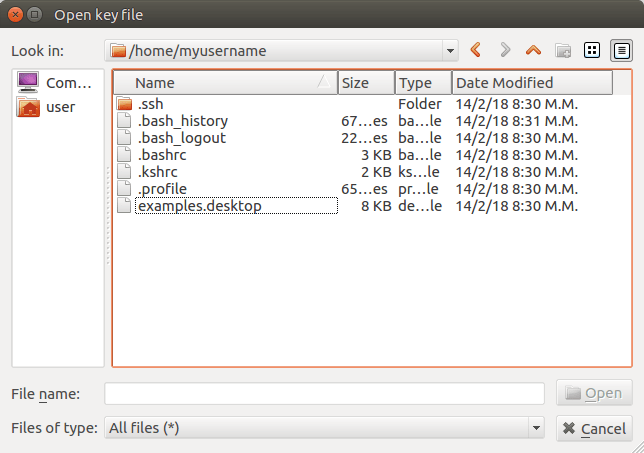
- Click on the file selector at RSA/DSA key for ssh connection to select the private key file of the SSH keypair.
Initially, the file selector dialog looks like below. Right click on the empty area and select Show hidden files.

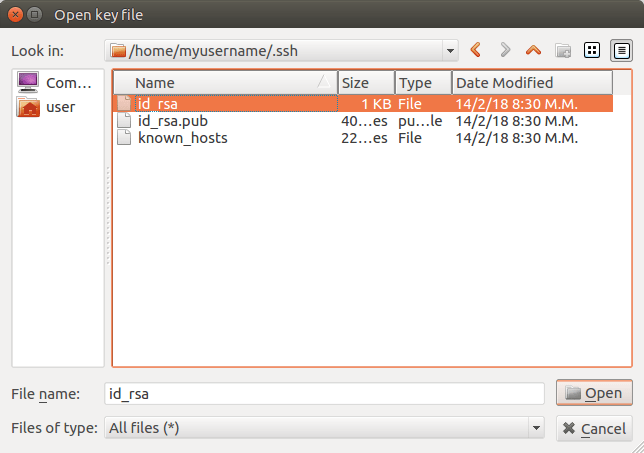
Then, you can view the hidden files and specifically the .ssh/ subdirectory with the SSH keypair.

Click on .ssh to enter the directory. Now you can see the keypair, both id_rsa (private) and id_rsa.pub (public). Click to select id_rsa, then click on the Open button to make complete the file selection.

- For session type, select Single application, and then specify the command name, xclock.

Click on OK to save the session.

Here is how the xclock session icon looks in the X2Go client window. Click on it to run the session.
![]()
THe X2Go Client makes a connection to the LXD x2go container, runs the xclock command and shows us the window as shown below.
.
Note that the clock looks more basic (just black & white) than the one from SSH with X11 forwarding, shown earlier. This is because of the speed optimizations of X2Go, which can become apparent when trying other GUI apps.
Installing Firefox
If you want to install any other GUI application in the LXD container, the steps are as follows (using Mozilla Firefox as an example).
- Install firefox in the x2go container.
$ lxc exec x2go -- apt install -y firefox
- Create a new session on X2Go client for Firefox and fill in as follows. For command, we selected from the drop-down menu the Internet browser. This corresponds to the default Internet browser in the container. If instead you installed Chromium or Chrome, then with the same setting your browser would also run.

- That’s it.

Installing a desktop environment in the container
We have seen how to run individual single applications. How about a desktop environment? It’s time for Ubuntu MATE!
Installing Ubuntu MATE in the LXD container
We are installing this Ubuntu MATE for Xenial (Ubuntu 16.04). Here are the commands.
$ lxc exec x2go -- apt-add-repository ppa:ubuntu-mate-dev/ xenial- mate $ lxc exec x2go -- apt update $ lxc exec x2go -- apt install ubuntu-mate-core
Troubleshooting
Help! Problem with package installation, regarding Bluetooth.
Do you get the following error when installing Ubuntu MATE?
Errors were encountered while processing:
 bluez
 gnome-bluetooth
 gnome-user-share
 pulseaudio-module-bluetooth
 ubuntu-mate-core
 indicator-bluetooth
 unity-control-center
 unity-control-center-signon
 E: Sub-process /usr/bin/dpkg returned an error code (1)
Then, disable Bluetooth in the container.
$ lxc exec x2go -- systemctl disable bluetooth
Configuring X2Go Client for Ubuntu MATE
Create a new session in X2Go Client with the following configuration.
Compared to the previous sessions, here we simply selected MATE at the Session type.

Run the session and you get the following. Ubuntu MATE running from withing an LXD container.

Configuring the published applications
You can configure individual application and you can configure a desktop environment through X2Go. Wouldn’t be nice if we could have access to any available GUI application in the LXD container? For example, any application that is listed in /usr/share/applications?
That’s what Published applications does in X2Go. Let’s do it.
- Create a new session in X2Go Client. Set the details as follows. Note that the main change is for the Session type to Published applications. Click OK.

- Start the session Ubuntu MATE Applications. By doing so, the X2Go client window will get minimized, and what remains is that small baby seal icon at the top right of your screen. It looks like this (the first icon),

- Click on the baby seal and you get all the applications that have been installed in the MATE session. In fact, it is anything that has a .desktop file in /etc/x2go/applications (which is a link to /usr/share/applications/, the location where installed GUI applications place their .desktop description files).

If it looks a bit faded, it’s because it has to do with the way screenshots are taken. You press Prtn Scr to take the screenshot, but if you press a key while pop-up windows are showing, those windows start to go away. They go away somewhat slowly due to desktop effects. It is enough though for gnome-screenshot to take a screenshot. As an alternative, we could have used the GIMP for a proper screenshot.


Overall, the Published Applications offer the best usability to run any apps from the LXD container.
Troubleshooting
Help! I want to update packages. What is the password for Ubuntu MATE?
When you launch an Ubuntu container image with LXD, you end up having by default a non-root user account with username ubuntu. This account can sudo to root and it is locked. That is, it does not have a password. For the purposes of LXD, it’s fine because we can connect to it from root with sudo –user ubuntu –login. But the Ubuntu MATE desktop needs to have a password so that you can, for example, install updates. So, what do you do? You set a password. Run this from the host.
$ lxc exec x2go -- passwd ubuntu
Enter new UNIX password: <type a password>
Retype new UNIX password: <type again the same password>
passwd: password updated successfully
Help! How do I exit from Ubuntu MATE in-a-container?
Just click on the shutdown button.

Help! How do I change the image quality in X2Go Client?
The default settings in X2Go Client are sufficient if the LXD container is located far away at some other network. You may change the quality settings if you have fast Internet connection. You can do this in the configuration of the session in X2Go Client. By specifying your network connection speed, you give a hint to X2Go on the quality of the session. The compression methods that are of jpg, make a lossy compression that may be visible to the eye. Here we tried out 256k-png (256000 colors, no lossy compression).

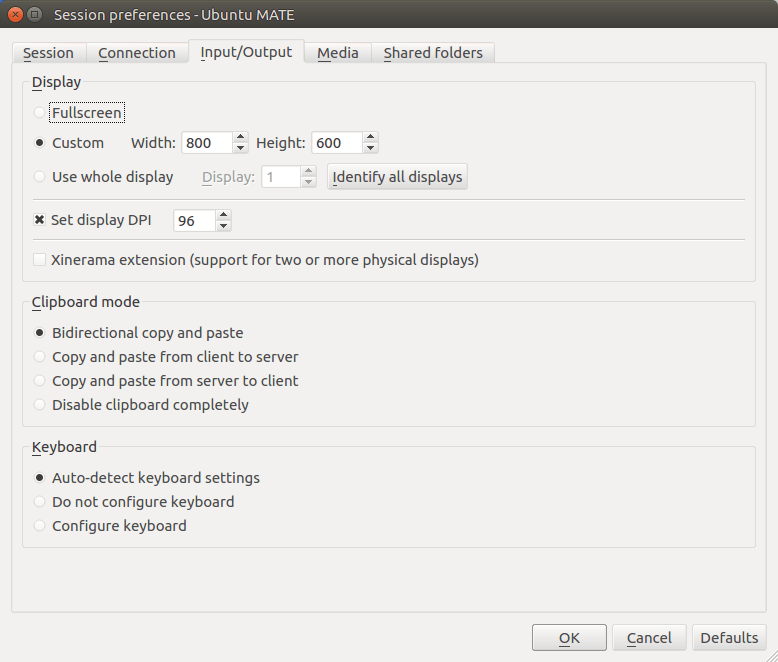
Help! How can I change the display size in X2Go? And other settings about Input/Output.
Go to the session settings, to the Input/Output tab. You can change the size of the session window and also make it show on a specific whole display, or even on all displays.
Help! Can I have sound from the container?
Sound is enabled by default.

Help! Can I share a folder between the LXD host and the LXD container, through X2Go?
Go to the session configuration at the tab Shared folders. Click on the blue icon to select the shared folder. Here we selected /home/myusername/X2GO-SHARED/. Finally, click on the Add button.

The shared folder has been added. There is a flag to automount it. Select it, then click OK.

When you start the Ubuntu MATE session, you can find the shared folder in the following location. The user account in the container has a media folder (created by MATE). In there, there are subfolders about different types of media. The shared folder is in the disk subfolder.

Conclusion
We managed to get a single application and a desktop environment to run in a LXD container through X2Go. We have seen the core functionality that X2Go offers. You can decide where to use this.
17 comments
Skip to comment form
Thanks for this comprehensive introduction.
Works as discribed. However: Using Awesome as WM (instead of Mate) only works after installing something like “apt install ubuntu desktop”.
If a tiling windowmanager (like awesome) is used in fuss-screen-modus, the application crashes upon start. Only if a »not screen filling window«-mode is used, anything works as expected.
It took me a long time to figure the difference between
— running x-applications from inside the container and
— calling x-applications from the outside.
if you configure the container to display applications from the inside, you cannot use x2go.
hartmut
Author
Thanks!
The package *ubuntu-desktop* brings in the whole shebang. It would be possible to selectively install packages to make it work and also keep a smaller container.
Thank you for the excellent tutorial!
What is the best way to configure X2Go when a desktop is needed inside of a nested container?
Currently I have a working LXC Ubuntu 14.04 container with X2Go server installed and am viewing it through the host using the X2Go client per this tutorial. Works great!
However, when that same 14.04 container is nested inside of another Ubuntu 16.04 container, I see no (etho) IP address to connect the X2Go client to? Is it possible to use the X2Go client on my host to reach the nested container, or do I need to install a separate X2Go client on the outer 16.04 nesting container?
Any suggestions on how to configure either one of the LXC containers to accomplish this goal would be greatly appreciated.
Thank you.
Chuck
Author
Thanks!
The X2Go client connects to a container over SSH on the default port 22. You can find those details in the Session Preferences of your connection.
Therefore, in order to connect to a nested container, you would need to somehow expose the SSH port of the nested container to the container it belongs in. That is, if you connect to port, let’s say, 2222 of the container, the connection is forwarded to port 22 of the nested container. In that case, you would need to set up in the Session Preferences the port to be 2222 instead of the default 22.
If you use LXD 2.0, you can set up an `iptables` rule in the container to perform the forwarding from port 2222 to port 22 of the nested container.
If you use LXD 3.0, you also have the option to use an LXD `proxy` device.
For more, see https://github.com/lxc/lxd/blob/master/doc/containers.md#type-proxy
Thank you! This really helps.
A perhaps easier question. Now that I have X2go working inside of an LXD container on my local machine, I would like to try and access an LXD container inside of an Amazon cloud instance. Do you foresee any challenges of connecting to X2Go inside of an LXD container once I am authenticated into an Amazon Ubuntu 16.04 image?
Thank you again for your great tutorials.
Chuck
Author
If you can SSH into that LXD container, then you can configure your X2Go client on your desktop to access the cloud instance.
Thank you!!! Just for clarification, does that mean I need to install an X2GO server on my Amazon base Ubuntu image as well? Or, is there is an IP forwarding/Proxy trick to configure my remote X2Go client to tunnel through my cloud OS image directly into my LXC container X2GO server?
Thanks again. Your tutorials are amazing.
Best Regards,
Chuck
Author
The post has two main sections, the part that you install on the LXD container (i.e. Amazon Ubuntu image in your case), and the part that you install on your desktop.
If your Amazon Ubuntu image is not directly accessible over SSH, then you need to setup IP forwarding or something similar. Or, you can set up SSH chaining (google about this) if you need to SSH more than once to reach the container.
Great job on this write-up Simos !
Author
Thanks Brian!
Thanks for putting this together.
Q: Is the host required to be running a desktop, I’m having issues with getting this to run on a clean Ubuntu Server install?
Author
You do not need the host to run a desktop environment.
If your host is a clean Ubuntu Server, then you may need to add some extra packages that are pre-installed on Ubuntu desktop.
I have not tried these instructions yet on Ubuntu Server so I cannot help you directly. If you have some error messages, post them here and I can have a look at them.
I want to render with OpenGL in LXD without an X Server in host. what can I do ?
Author
These instructions do not support accelerated graphics rendering. My tutorial that is more related to your question, is this one, https://blog.simos.info/running-steam-in-a-lxd-system-container/
I replied to your question on dlo (discuss.linuxcontainers.org) at https://discuss.linuxcontainers.org/t/gui-apps-in-lxd-container/4612/26?u=simos
Author
Hi!
You get a
No route to hosterror. This is a networking error,and most likely occurs when you are connecting remotely to the LXD host.
Can you tell me a bit more about your setup?